 By Hina
Let me share a personal story with you. Last year, when we moved into a new house, our budget for furniture was very tight. The joy of the new home was there, but seeing the empty rooms made my heart sink. My mother suggested I use old things. I thought she was joking.
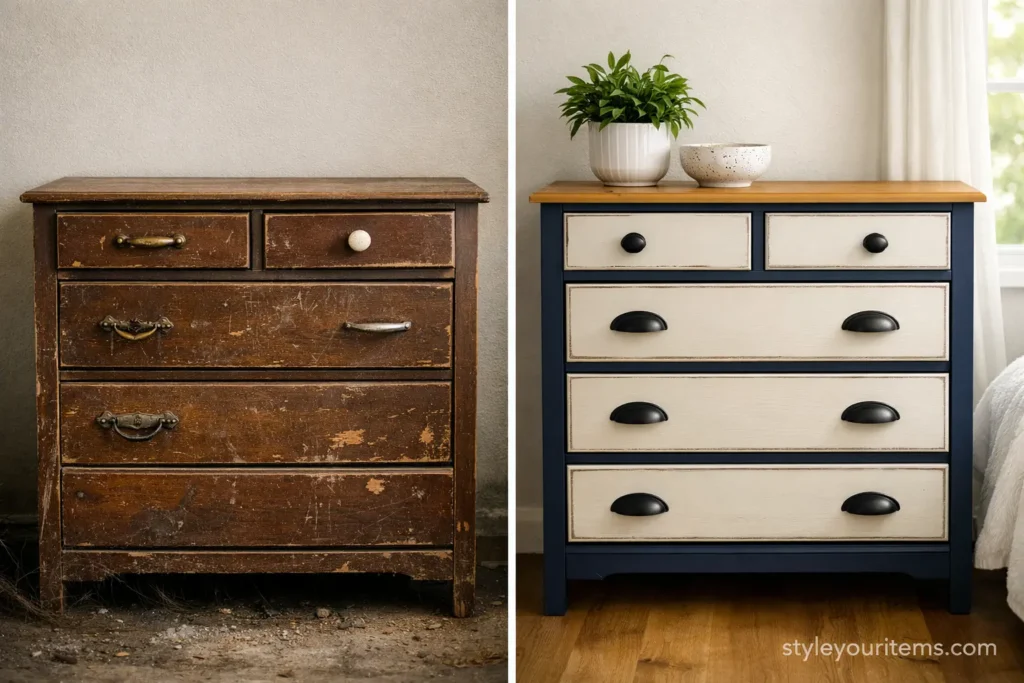
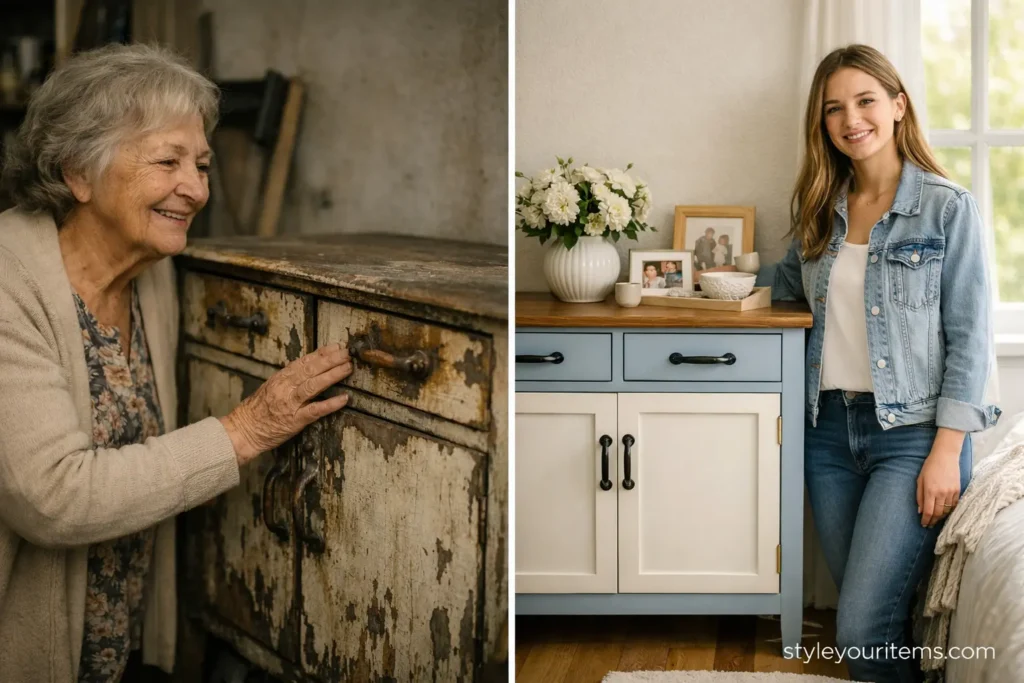
But then I decided to take on the challenge. I took my grandmother’s old cabinet, which had been sitting in the storage room for years. It was covered in dust, its color had faded, and one of the doors was even crooked. My husband said we should just throw it away.
Today, that same cabinet is the highlight of our bedroom. I painted it a light blue, changed the handles, and added wallpaper to the inside. Whenever guests come over, they ask where I bought it. When I tell them it’s my grandmother’s old piece, everyone is amazed.
It wasn’t just a cabinet; it was a lesson for me. I learned that if you breathe new life into old things, they can become even more beautiful than new ones.
Today, I’m going to share all the methods I’ve tried myself. Some techniques I learned from books, some from YouTube, and some I learned from my own mistakes. I’m writing this guide so you can avoid the mistakes I made.
Step 1: Identify Which Furniture is Worth Saving
Before you pick up a brush, you need to know which pieces are worth the effort and which ones are truly beyond repair. I made this mistake in the beginning. Once, I spent three days working on a table—painting, polishing—only to discover that the frame was hollow from the inside.
Work on pieces that are:
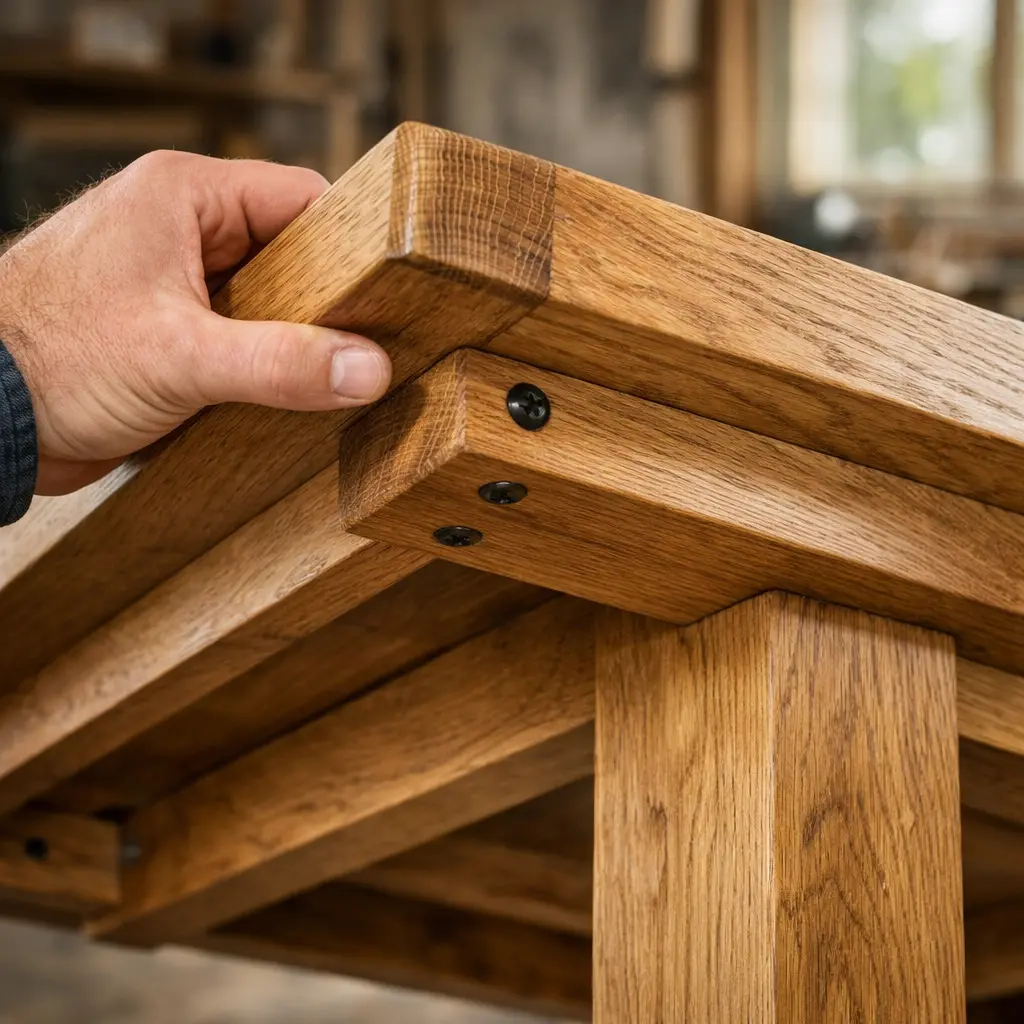
Made of solid wood – This is the most important factor. If your furniture is made of chipboard or particle board, it’s difficult to paint and won’t last long. Solid wood pieces have soul. How do you identify it? Lift the cabinet or table. If it’s heavy, it’s likely solid wood. Look at the underside; if you can clearly see the wood grain, that’s a good sign.
Structurally sound – When you shake it, does it move? If only the doors or drawers are loose, that’s usually fixable. But if the entire frame is wobbling, it will be difficult to repair. I once sat inside my cabinet (I don’t know why) and broke its leg. It was possible to fix, but it required a lot of work.
You have a connection with – This is perhaps the most important point. If you don’t like a particular old piece, you probably won’t like it even after putting in the hard work. Focus on pieces that speak to you.
You may be interested in 37+ Designs She Shed Ideas That Inspire
Step 2: Get to Know Your Furniture
Every old piece has its own story. It’s important to understand it. Whenever I bring home an old piece, I first examine it closely. What type of wood is it? What kind of finish does it have? Is there any old mark or label?
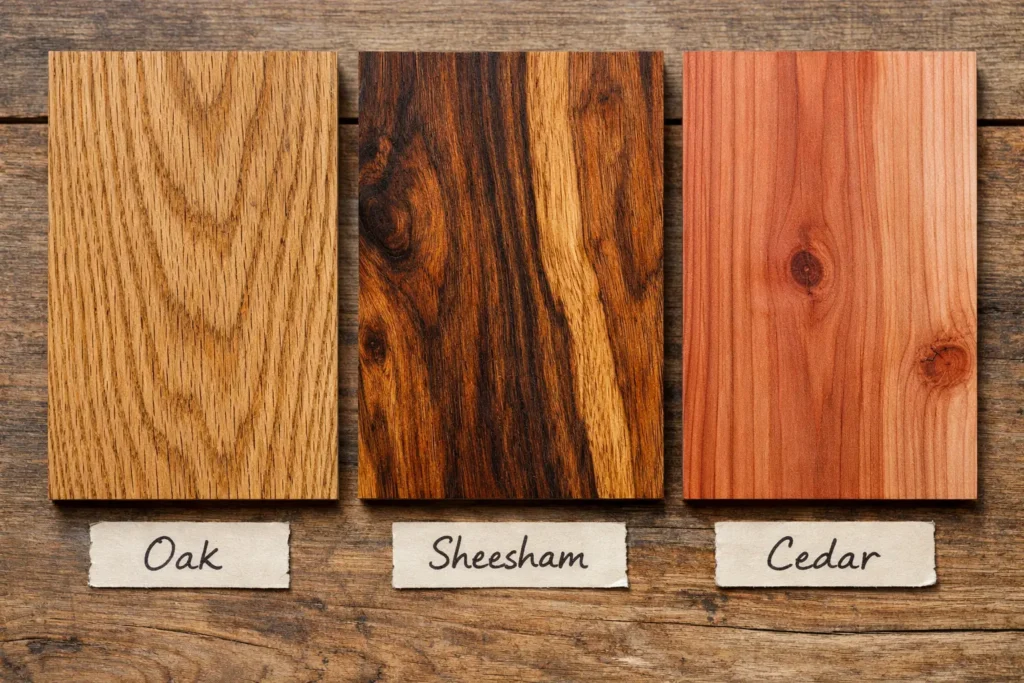
Different Wood Types and How to Care for Them:
Oak – This is a very strong wood. Old furniture often uses oak. It takes paint very well. If you prefer a natural look, you can simply oil and polish it.
Sheesham (Indian Rosewood) – This is a beautiful wood with dark and light streaks. Think twice before painting sheesham, as its natural beauty is unparalleled. I once painted a sheesham table and regretted it deeply afterwards.
Deodar (Cedar) – A light and soft wood. Paint looks great on it. Old rustic furniture was often made from deodar.
Identifying Old Paint on Furniture:
If your furniture already has paint on it, it’s important to know what kind it is. Old paint sometimes contains lead, which is harmful to health. If the paint is peeling and there’s another layer underneath, proceed with caution. In such cases, use a chemical paint stripper and wear a mask.
Once, I cleaned an old cabinet without wearing a mask. I had a cough for the next two days. Now, I never work without taking proper precautions.
Step 3: Cleaning and Preparation – The Most Important Task
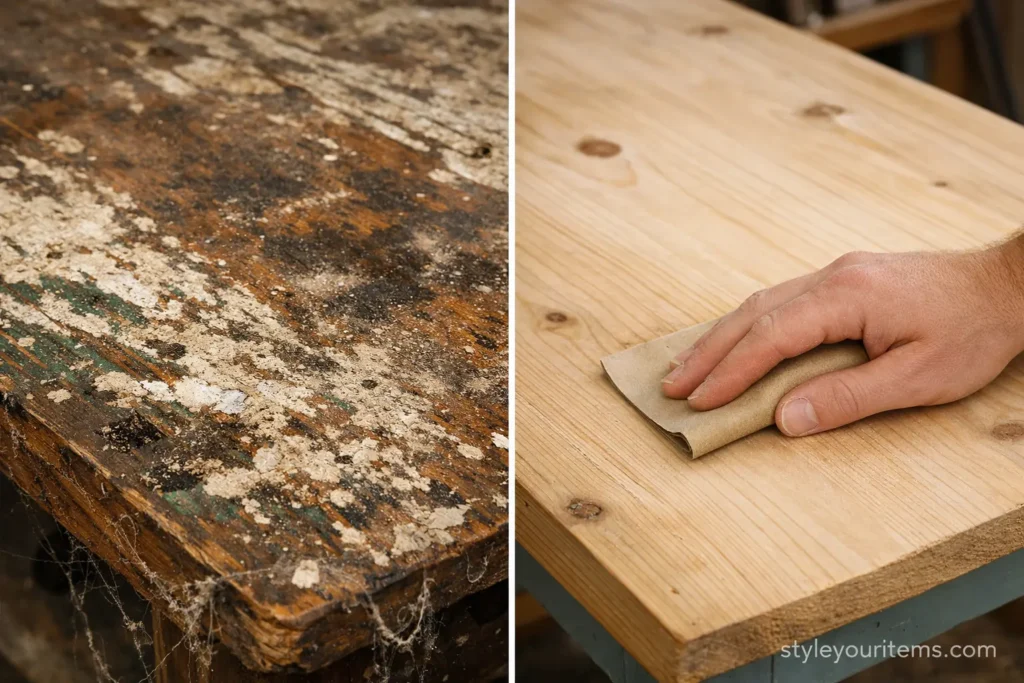
This is the step that most people skip in a hurry. I used to do the same thing in the beginning. I thought I’d just apply the paint and be done with it. But then the paint would start peeling, and stains would show through.
The Cleaning Process:
Day One: Just Cleaning
First, dust the furniture. Then, clean it with a damp cloth using warm water mixed with a little dish soap. Don’t use too much water, or the wood will absorb the moisture. If there’s old grease or wax, a solution of vinegar and water works wonders.
I mix one cup of white vinegar with two cups of warm water to clean old grease. It’s better than harsh chemicals and doesn’t damage the wood.
Day Two: Sanding
This is the task that most people dread. But it’s not as difficult as it seems. You’ll need two types of sandpaper – coarse (80 to 120 grit) and fine (220 grit).
First, use the coarse paper to remove the old varnish or paint. Always sand in the direction of the wood grain. Then, use the fine paper to smooth the surface.
Learning to use an electric sander made my life much easier. If you paint furniture frequently, it’s a good investment. Otherwise, hand sanding works, it just takes more time.
Day Three: Primer
Applying primer is very important. It helps the paint adhere to the wood and ensures the paint lasts longer. Buy a good quality primer. I use Ziss primer, which is easily available.
Apply a thin coat of primer and let it dry for 24 hours. Apply a second coat if necessary.
Step 4: Choosing the Paint – Which Paint to Use When
Here, I’ll explain the different types of paint. In the beginning, I used to get confused about which paint to use where.
Chalk Paint
This paint is perfect for beginners. It requires minimal sanding before application. It dries quickly and has a matte finish.
When to use it: When you want to give your furniture a vintage or shabby chic look. Applying wax over chalk paint enhances its beauty.
Where to find it: In the US and UK, it’s readily available at most craft stores (like Michaels or Hobby Lobby) and online (Amazon).
Drawback: It must be sealed; otherwise, water stains can occur.
Milk Paint
This comes in powder form and needs to be mixed with water. It’s completely natural and chemical-free. Its specialty is that it absorbs into the wood, creating a finish that looks centuries old.
When to use it: When you want an authentic, historic look.
How to apply: Mix the powder with water. Apply a thin coat. Once dry, lightly sand certain areas to achieve a worn, aged effect.
Acrylic Paint
This is a water-based paint found in most hardware stores. Its advantage is that it’s affordable and available in many colors.
When to use it: When you’re on a tight budget.
Drawback: It’s not as thick as chalk paint and usually requires multiple coats.
Oil-Based Paint
This is the traditional method our parents used. It’s very durable and long-lasting.
When to use it: For high-use furniture like dining tables or chairs.
Drawback: It takes a long time to dry and has a strong odor.
Step 5: Painting Techniques That Will Make You an Expert
I’ve tried several painting methods. Some were successful, some were not. But the techniques I’m sharing with you work every time.
Solid Color
This is the simplest method. Just apply two to three thin coats of paint. Allow six to eight hours between each coat. Rushing will cause the paint to peel.
Two-Tone
This method is becoming very popular. It involves painting the top section of the furniture one color and the bottom section another.
Example: Take an old cabinet. Paint the body a deep navy blue and the drawers a light blue or white.
How to do it: Apply the lighter color first. Then, use painter’s tape to create a line and apply the darker color. Remove the tape when the paint is slightly dry but not completely hardened.
Distressed Finish
This technique makes an old piece look even more antique and charming. Essentially, we intentionally remove some of the top paint layer to reveal the wood or original color underneath.
How to do it: Apply primer first. Then apply your base color (usually a darker shade). Apply wax on the areas you want to look worn. Then apply the top coat. Once the top coat is dry, lightly sand the areas where you applied the wax. The wax will cause the top coat to come off easily.
I tried this method on my grandmother’s cabinet. The dark brown color emerged from the edges, making the cabinet look authentically old and valuable.
Color Wash
This technique is used when you don’t want to hide the wood grain but simply add a hint of color.
How to do it: Thin the paint by mixing it with water. Apply it to the wood and immediately wipe it off with a cloth. The color will settle into the wood grain, creating a very subtle and beautiful effect.
Step 6: Hardware – Small Changes Make a Big Difference
Once, I painted an old cabinet beautifully. But I kept the old handles. The result was that the cabinet looked neither old nor new. It felt incomplete.
Then I changed the handles. And just like that, the cabinet was complete.
Important Things to Know About Hardware:
Give old handles a new look – If your handles are original and vintage, you can refresh them instead of replacing them. Clean off any old paint. If they are brass, soak them in a solution of vinegar and salt. After a few hours, clean them with a brush, and they will shine again.
Choosing new handles – There are many options in the market. In my opinion, simple and classic designs have more longevity. Handles with very modern or quirky designs tend to look dated quickly.
Pay attention to size – Measure the distance between the holes of the old handles. Most handles have a spacing of 3 inches or 4 inches. Buy new handles with the same spacing; otherwise, you’ll have to drill new holes.
Step 7: Fabric and Upholstery – Giving Furniture New Life
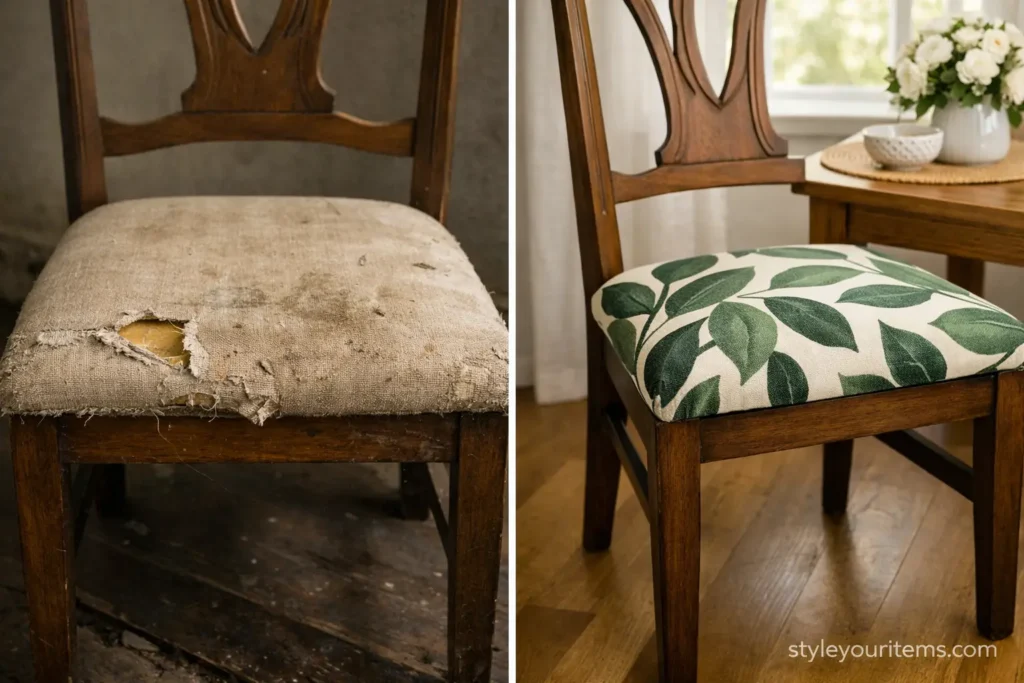
Some old pieces have a sturdy frame, but the fabric is worn out. Chairs, sofas, dining chairs – by changing their fabric, you can make them look brand new.
Choosing the Fabric:
Choose durable fabric – If the chair will be used frequently, choose a sturdy fabric like canvas or denim. If it’s purely decorative, you can use velvet or linen.
Use the old fabric as a pattern – Carefully remove the old fabric. Lay the pieces on your new fabric and cut around them, leaving an extra two inches on all sides.
Using a staple gun – Use a staple gun to attach the fabric to the frame. Start from the center and work your way outwards. Pull the fabric taut as you go to prevent it from being loose. Fold the corners neatly.
The first time I upholstered something, I left the fabric too loose. Within days, it had wrinkles. Now I pull the fabric so tight that my hands get blisters, but the result is excellent.
Step 8: The Magic of Wallpaper – A Small Detail with a Big Impact
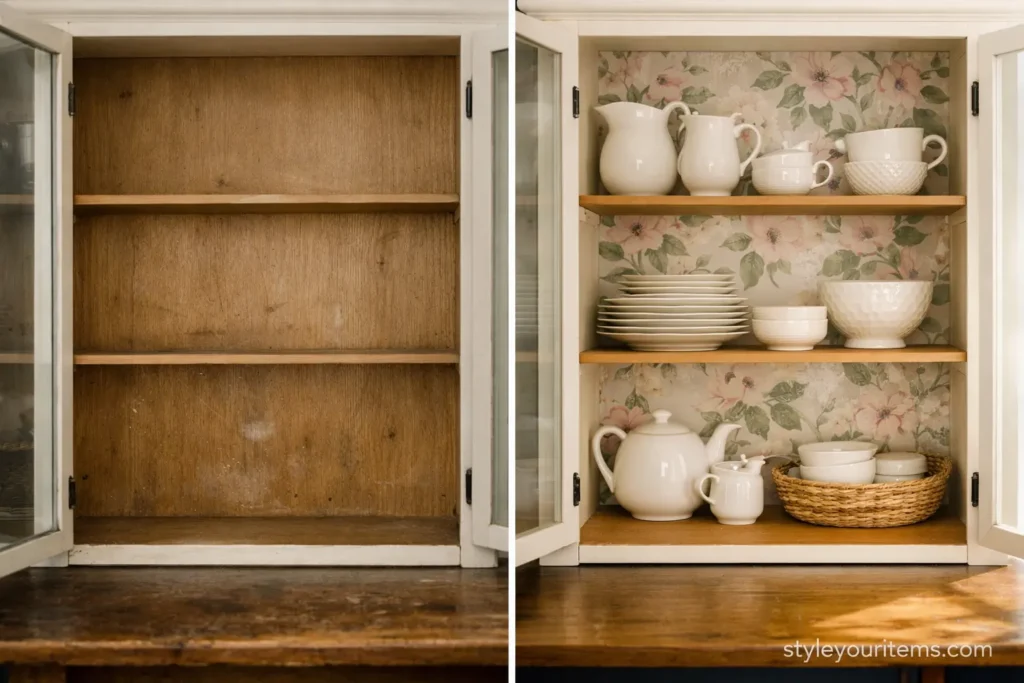
This is my favorite method because it’s easy and the results are beautiful.
Where to Use It:
Behind cabinets – If your cabinet has glass doors or is open, apply wallpaper to the back panel. When you place items inside, the background will look beautiful.
Inside drawers – This is an area most people don’t see, but opening a drawer to find patterned wallpaper inside brings a little joy.
Bookshelf back panels – This is a very popular technique. Paint the bookshelf and apply a bold wallpaper to the back.
How to Apply:
First, clean the surface. Measure and cut the wallpaper. Then apply wallpaper paste or adhesive to the back. Carefully apply it to the surface and use a card to smooth out any air bubbles.
I added floral wallpaper to the drawers of my nightstand. Whenever I open those drawers, it makes me smile. It’s a small detail, but it brings life to the furniture.
Step 9: Creative Repurposing – New Uses for Old Things
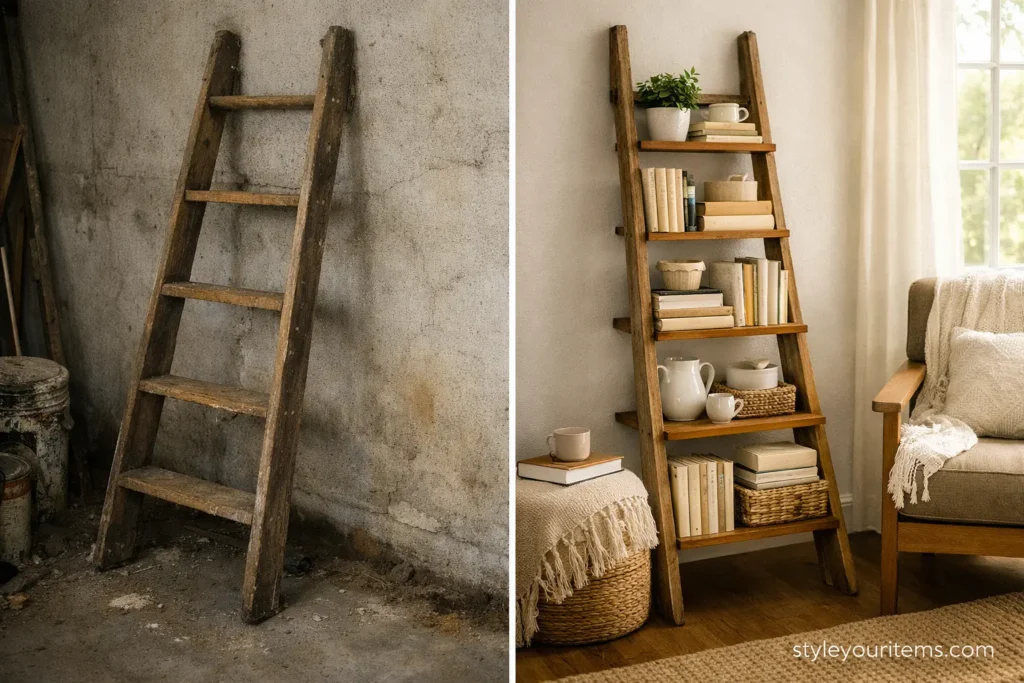
Sometimes, it’s more fun to invent an entirely new use for an old item rather than using it as-is. Here are some experiments I’ve done that were successful.
Old Ladder into a Bookshelf
There was an old wooden ladder at my grandfather’s house. It was quite old, and the wood had woodworm damage. I cleaned it, treated it for pests, and then leaned it against the wall. I placed books on the rungs. Now it’s a unique bookshelf.
Old Door into a Headboard
I once found an old wooden door with intricate carvings. I cleaned it, painted it white, and attached it to the wall behind my bed. Now it’s a headboard, and everyone asks where I found it.
Suitcase into a Side Table
Take an old suitcase and attach four legs to the bottom. Place a piece of glass on top. You now have a beautiful side table. You can also store blankets or other items inside.
Old Window Frame into a Photo Frame
Clean an old wooden window frame. Attach wires or strings to the back to hang photos from. Hang it on the wall. It becomes a large, unique photo frame.
Also read: 8 Creative DIY Ways to Beautify Your Home’s Walls
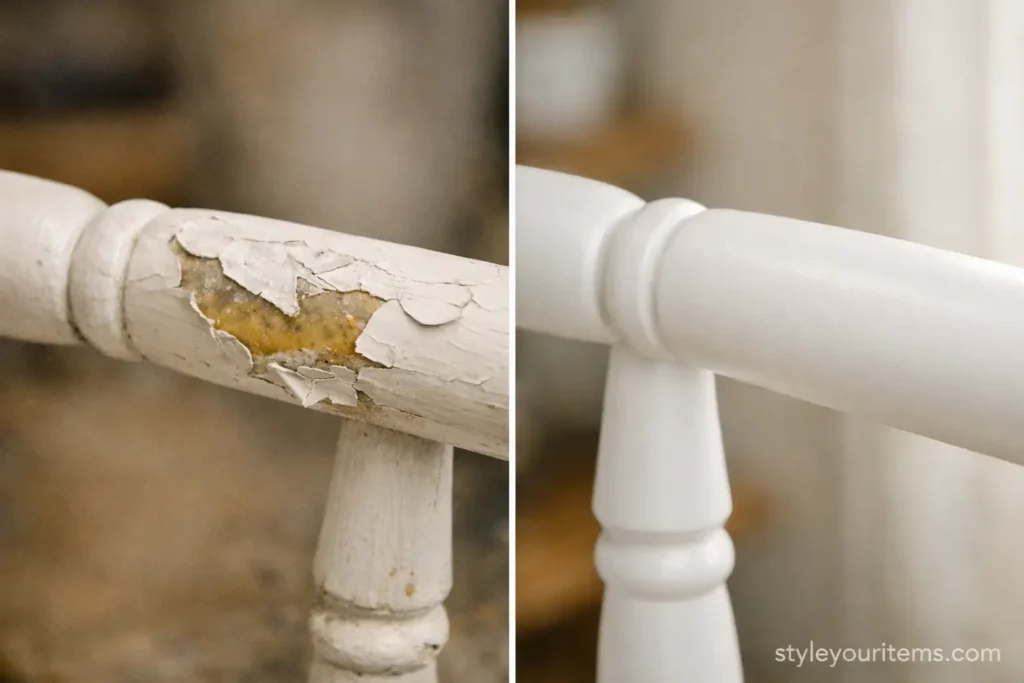
Step 10: Sealing and Protection – Finishing the Job Right
Many people forget that the paint needs to be sealed after they’re done painting. I made this mistake too. The first time tea spilled on my dining table, the stain wouldn’t come out.
Which Sealer to Use:
Water-Based Polyurethane – This is the best option. It’s clear, has low odor, and dries quickly. Apply two to three coats.
Varnish – A traditional method. It’s durable but has a strong odor and takes a long time to dry.
Wax – Wax works very well over chalk paint. However, it doesn’t offer much protection against water. If the furniture won’t be used heavily, wax is sufficient.
Hemp Oil – Excellent for natural wood. It absorbs into the wood and strengthens it from within.
Step 11: Furniture Care – How to Keep It Looking New for Years
You’ve worked hard to give your furniture a new look, so it’s important to maintain it.
Daily Care:
Dust daily with a soft cloth. Before cleaning with water or chemicals, test on a small, inconspicuous area. If your furniture is waxed, never clean it with water.
Once a Month:
Apply a fresh coat of wax to waxed furniture. Wipe painted furniture with a soft cloth.
Once a Year:
Check to see if any drawers have become loose or if any handles are wobbly. Make minor repairs immediately to prevent bigger problems.
Step 12: Common Mistakes and How to Fix Them
Here are mistakes I’ve made, so you can avoid them.
Mistake #1: Painting Without Cleaning
I once painted an old table without cleaning it first. Two weeks later, the paint started peeling. The grease underneath prevented the paint from adhering.
Solution: Clean thoroughly before painting. If there’s grease, use a vinegar solution.
Mistake #2: Using Cheap Brushes
Cheap brushes lose bristles, which end up in your paint, and can leave streaks.
Solution: Invest in a good quality brush. Purdy brushes are excellent. They cost more but last for years.
Mistake #3: Rushing the Process
Not allowing enough drying time between coats.
Solution: Wait at least 6 hours after each coat. If possible, wait 24 hours.
Mistake #4: Forgetting to Seal
Not sealing chalk paint or milk paint.
Solution: Apply wax or polyurethane after the paint is completely dry.
Mistake #5: Ignoring the Weather
Painting on a rainy day or when humidity is high.
Solution: Paint in dry, moderate weather. In extreme heat, paint dries too quickly and can crack.
Step 13: Current Trends – What’s Popular
If you want your furniture to look modern and trendy, consider these trends.
Warm and Earthy Tones – For the past few years, white and gray have been very popular. Now, warm colors are making a comeback. Terracotta, moss green, burnt orange – these colors are now in vogue.
The Return of Natural Wood – People are now preferring to show natural wood rather than painting everything. If you have beautiful sheesham or oak, consider just oiling and cleaning it instead of painting.
Rounded and Soft Shapes – Furniture with sharp edges used to be popular. Now, people prefer rounded, soft shapes. If your furniture feels too boxy, balance it with rounded handles or soft fabrics.
Mixed Materials – Combining wood with metal, glass, or rattan is very on-trend.
Step 14: Budget and Cost – How Much Will It Cost?
Everyone asks this question. I’ve kept track of all my project expenses.
Minimum Expense (if you have the basic supplies):
- Paint (one liter): $10 – $20
- Sandpaper: $2 – $5
- Brush: $5 – $10
- New handles (six pieces): $10 – $20
Total: Approximately $27 – $55
If You’re Buying Everything from Scratch:
- Primer: $8 – $12
- Paint (two liters): $20 – $40
- Sandpaper (coarse and fine): $5 – $8
- Good quality brush: $12 – $20
- Sander (if purchasing): $40 – $80 (one-time investment)
- Sealer: $10 – $15
- New handles: $15 – $25
Total: Approximately $70 – $120 (excluding sander)
Buy a sander once, and it will serve you for all your future projects. You can check more budget friendly ideas at DIY & Budget Decor which is free and have premium ideas and images.
Step 15: Where to Find Old Furniture
If you don’t have any old furniture in your own home, where can you find it?
In your own home – Check storage rooms for old items passed down from grandparents. Sometimes we have valuable pieces and don’t even know it.
From relatives – Many people want to get rid of old furniture. Just ask. I got two chairs from my aunt that she was planning to throw away.
Thrift Stores – In the US and UK, thrift stores (like Goodwill, Salvation Army) and charity shops are excellent sources for inexpensive, quality old furniture.
Online Marketplaces – Facebook Marketplace, Craigslist, and OfferUp are great places where people sell old furniture at low prices.
Garage/Yard Sales – On weekends, keep an eye out for garage or yard sales. You can often find hidden gems for a fraction of the cost.
Step 16: Safety First – Take Care of Yourself
I’m writing these points because I ignored them myself and regretted it later.
Wear a mask – When sanding, fine wood dust becomes airborne. This is harmful to your lungs. Wear a good quality mask (like an N95).
Wear gloves – Paints and chemicals can irritate your skin. Use rubber gloves.
Work in a well-ventilated area – Inhaling paint fumes for a long time can cause dizziness. Work in an open space or with windows open.
Keep away from children and pets – Paints and chemicals are dangerous for children and pets. Keep them away from your work area.
Fire safety – Oil-based paints and thinners are flammable. Keep them away from cigarettes or open flames.
Conclusion: What Will Your Story Be?
I’ve shared everything I’ve learned over the past five years. Some things I read in books, some I watched on YouTube, and a lot I learned from my own mistakes.
But the most important thing I’ve learned is that old furniture is not just a wooden structure. It holds stories. My grandmother’s cabinet holds memories of her youth. My aunt’s chairs bear the marks of her sitting in them. When I give these items a new look, I’m preserving those stories.
And that is the greatest joy of this work.
Now it’s your turn. Go into your home, open the storage room, or look around online and at local sales. Find an old piece that speaks to you. Then pick up a brush, choose a color, and give it a new life.
And when you do, please tell me about it. I’d love to hear your story.
Have you ever given a piece of old furniture a makeover? Share your experiences and photos in the comments below. I’d love to see your work!