 By Hina
You’ve felt it, haven’t you?
Spring comes, you go outside, bend down to prepare the soil, and then for the next two days your back hurts like you just spent two hours doing deadlifts at the gym.
Then there’s the weeds — where you thought you’d plant tomatoes, a jungle grows instead. And the soil? Either sand or clay, nothing grows in it.
A raised garden bed is the single answer to all these problems.
It’s the bridge that turns you from a “casual gardener” into a “pro grower.”

In this article, I’ll tell you:
- Why a raised bed saves both your back and your harvest
- Over 15 design ideas (each one separate)
- How to build one on a budget
- The golden formula for soil
- Which vegetables to plant and how to arrange them
Let’s get started.
1. Why a Raised Bed? — Strategic Benefits No One Talks About
Pro-Tip:
If you’ve ever gardened in regular ground soil, you know: you’re a slave to the soil. With a raised bed, you’re the master of the soil.
Benefit #1: Full Control Over the Soil
Whether your own ground is gravel, sand, or hard clay, in a raised bed, you put the soil you want. Soft, fertile, and light.
Check out more: Bedroom Decor Ideas 2026: Transform Your Bedroom with These Stunning Designs
Benefit #2: Protection for Your Back and Knees
When the bed is raised to waist height, you can garden sitting down or standing up. For elderly parents or people with disc problems, this is a gift.
Benefit #3: No More Drainage or Compaction Issues
People walk on the ground, and the soil gets hard. In a raised bed, you never step inside — the roots get room to breathe.
Benefit #4: Fewer Weeds, Fewer Pests
Because the bed is raised, crawling pests have a harder time reaching it. And weed seeds don’t blow up as easily.
15 Raised Garden Bed Ideas — Understand Each Design Separately
This section is your inspiration. I’ve described each idea individually. No grouping.
A. Traditional & Natural Designs
Idea 1: Classic Cedar or Redwood Frame
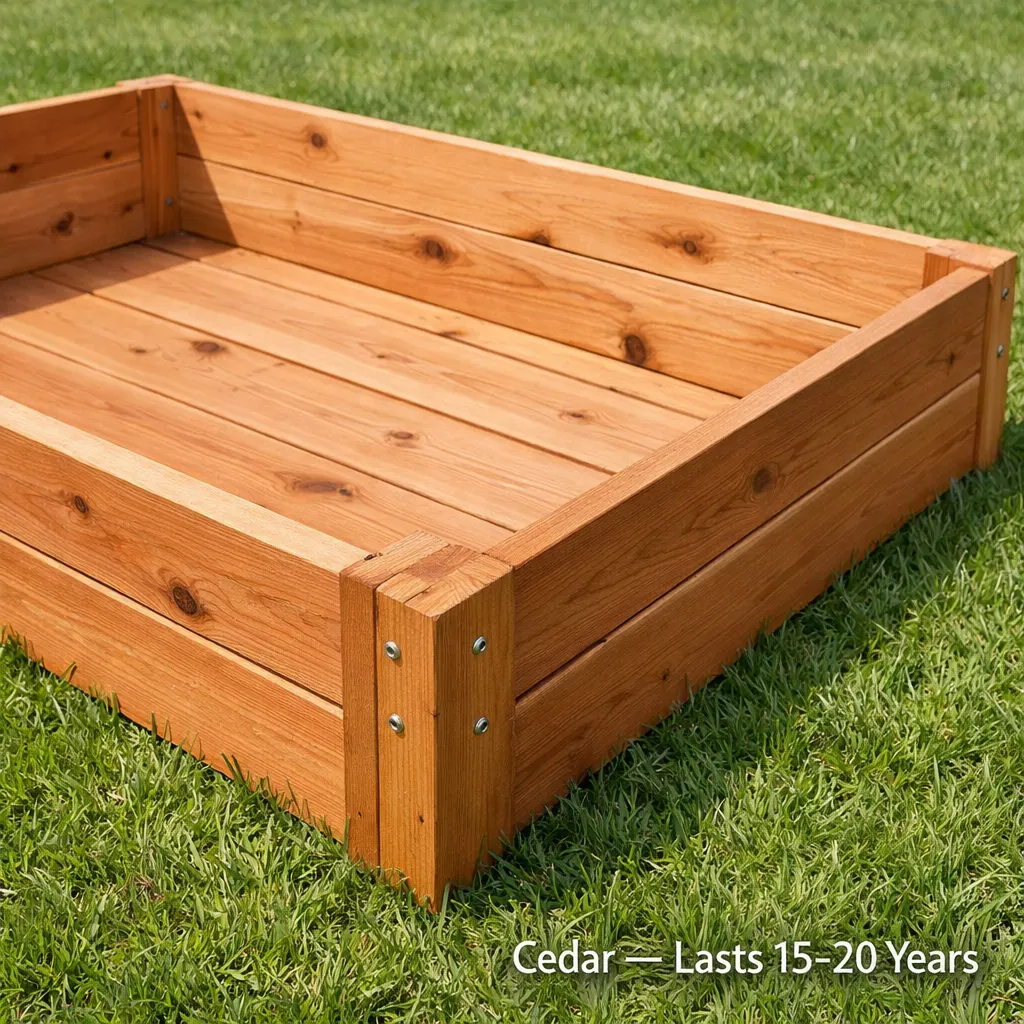
This is the gold standard. Cedar naturally resists rot, insects don’t eat it, and its natural reddish color is easy on the eyes.
- Why it works: Lasts 15-20 years without any chemicals.
- Cost: Medium to high, but you set it once and forget it.
Idea 2: Log & Branch Beds
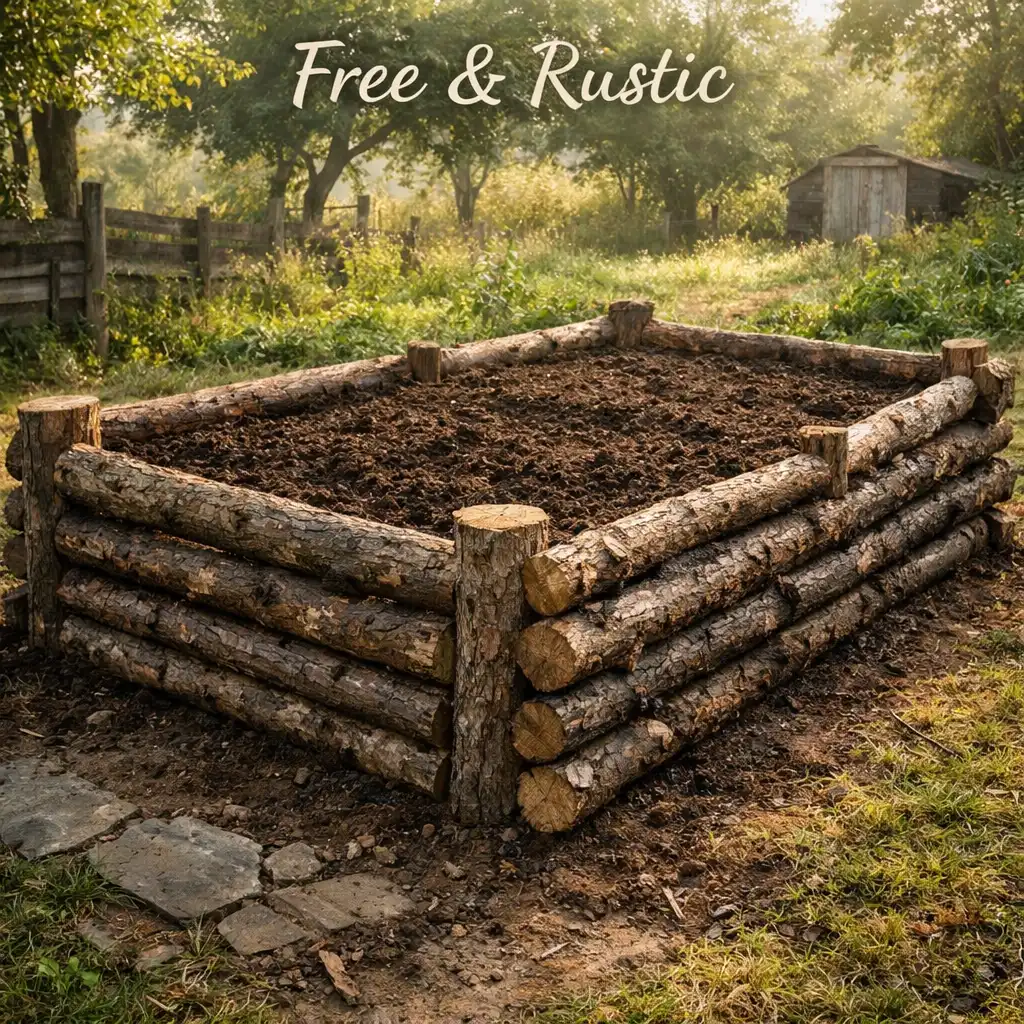
If you’ve had trees cut down in your yard, don’t throw them away. Stack thick branches on top of each other, fill with soil, and you have a rustic bed.
- Best for: Rural areas, cottage gardens, or wherever you can get free wood.
- Downside: After a few years, the branches may rot, but by then your soil will already be ready.
B. Budget & Recycled Ideas
Idea 3: Pallet Wood Beds

This is the cheapest option — often you can get pallets for free.
Designer’s Note:
Only use HT (Heat Treated) pallets. Pallets marked MB (Methyl Bromide) are toxic — don’t grow vegetables in them. Look for the HT stamp.
Break down the pallet, build a frame, and line the inside with landscape fabric. It’ll last two years, then build a new one.
Idea 4: Tin Roofing & Corrugated Metal
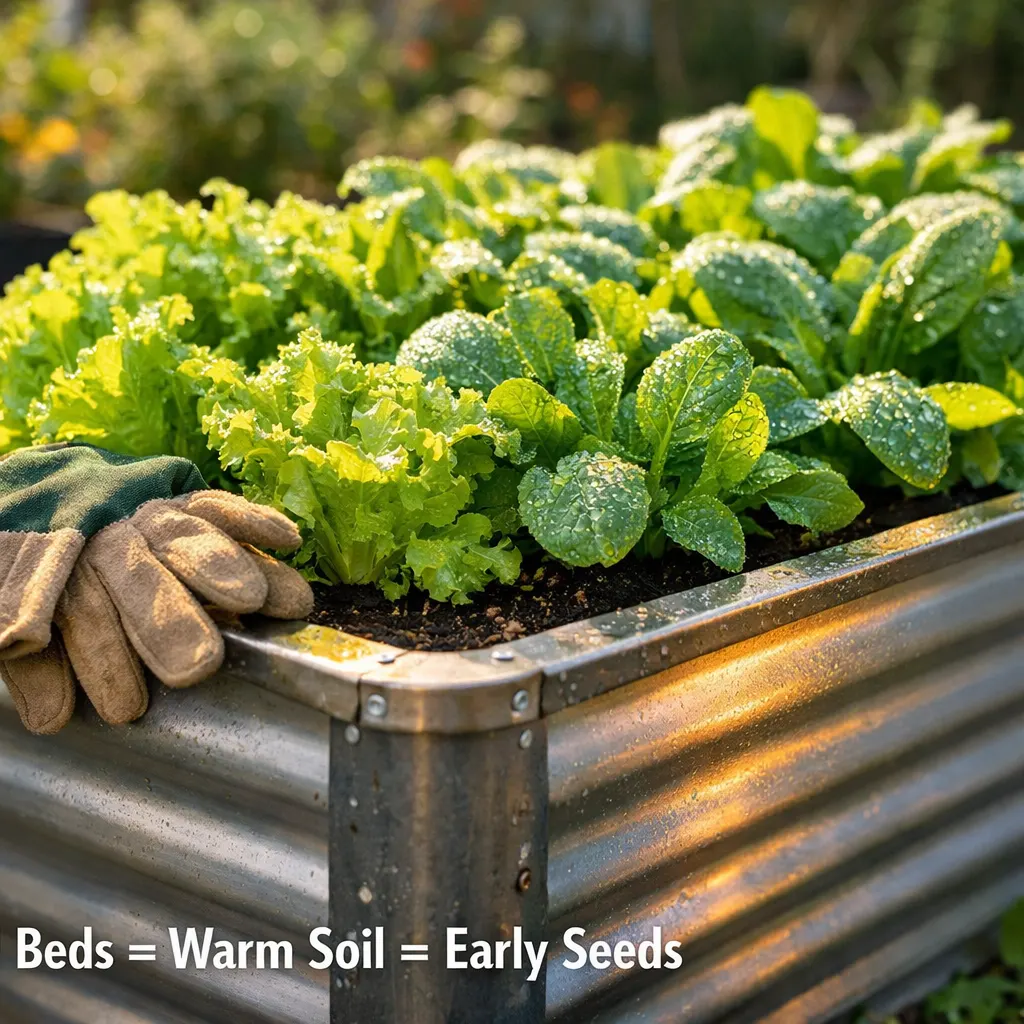
Corrugated metal sheets — the kind used on old roofs — make a modern and sturdy bed.
- Advantage: They get warm in the sun, so the soil heats up faster in spring. Seeds sprout earlier.
- Disadvantage: Edges can be sharp — wear gloves when working.
Idea 5: Cinder / Concrete Block Beds
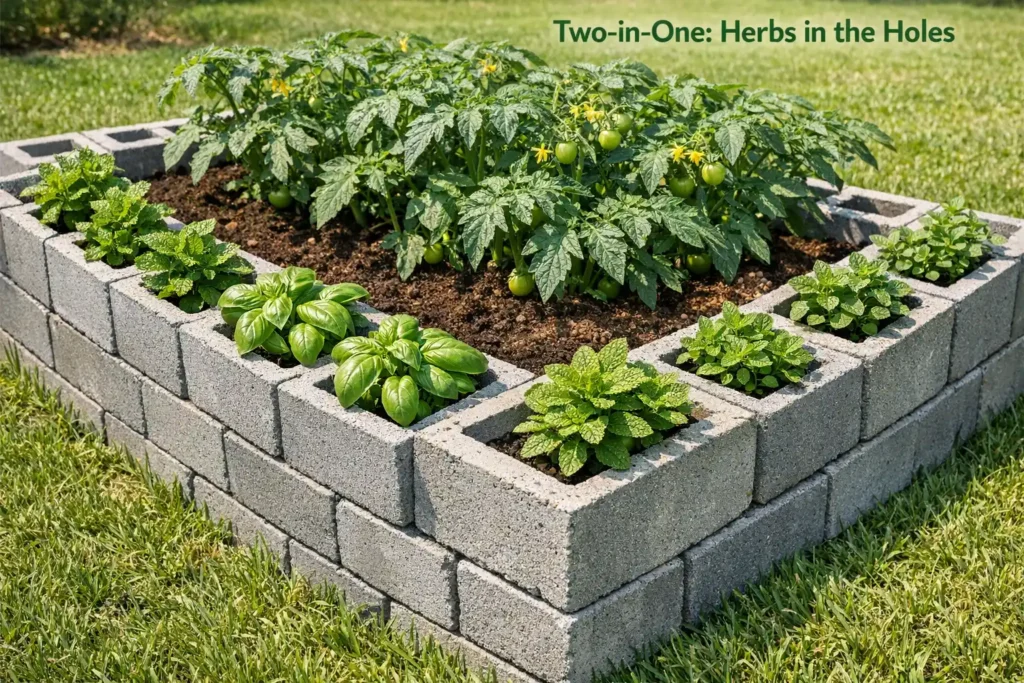
These are the same blocks used in walls. Stack them without any glue to form a bed.
Best part: In the holes inside the blocks, you can grow herbs like mint, basil, and oregano. Double the benefit.
- Cost: Very cheap.
- Caution: Some blocks contain lime that can make the soil alkaline — wash them well beforehand.
Idea 6: Plastic Barrel & Kiddie Pool Beds
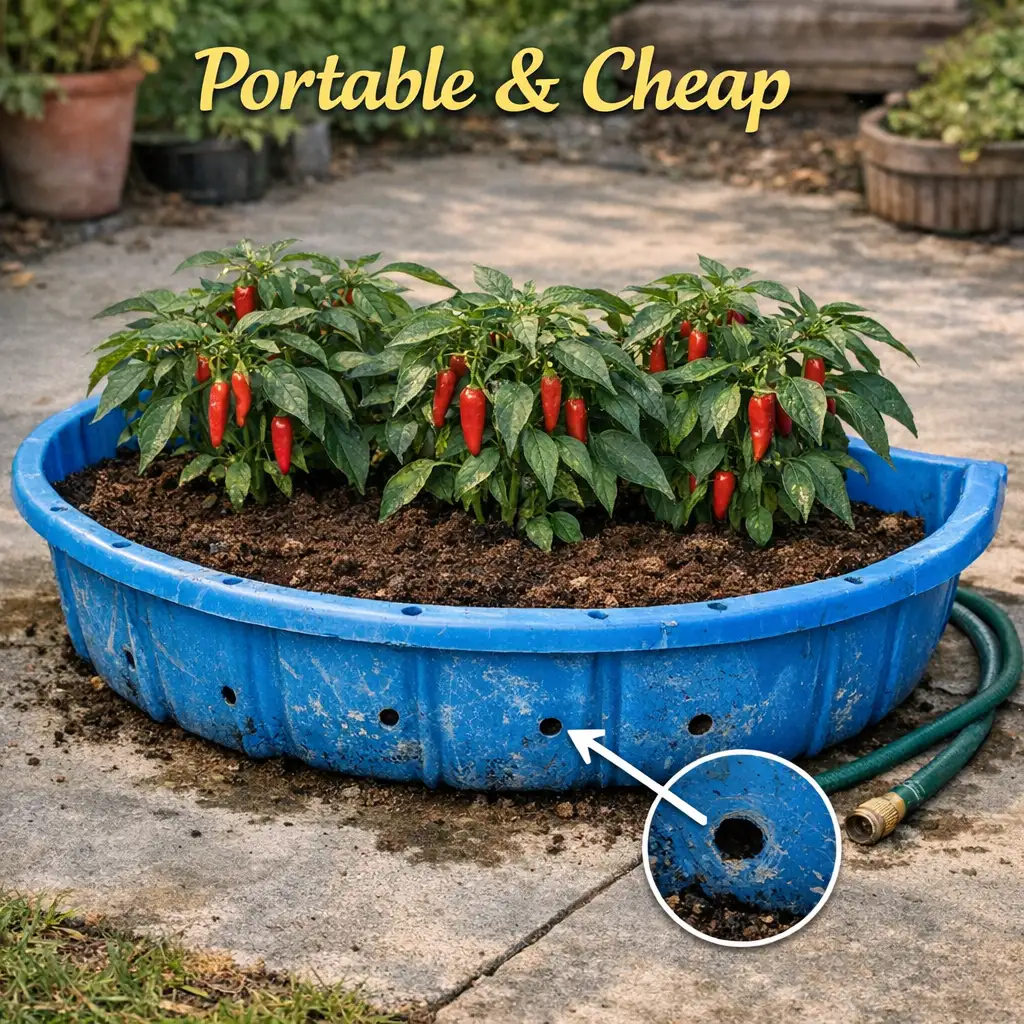
An old plastic barrel or a small children’s pool — cut it in half and drill holes in the bottom.
This bed is so light you can drag it around to follow the sun.
- Best for: Lemons, chilies, lettuce.
- Lifespan: 3-4 years, then the plastic gets brittle.
Read more: Aesthetic Bedroom Ideas for Small Rooms — 10 Stunning Designs
C. Modern & Durable
Idea 7: Galvanized Metal Stock Tanks
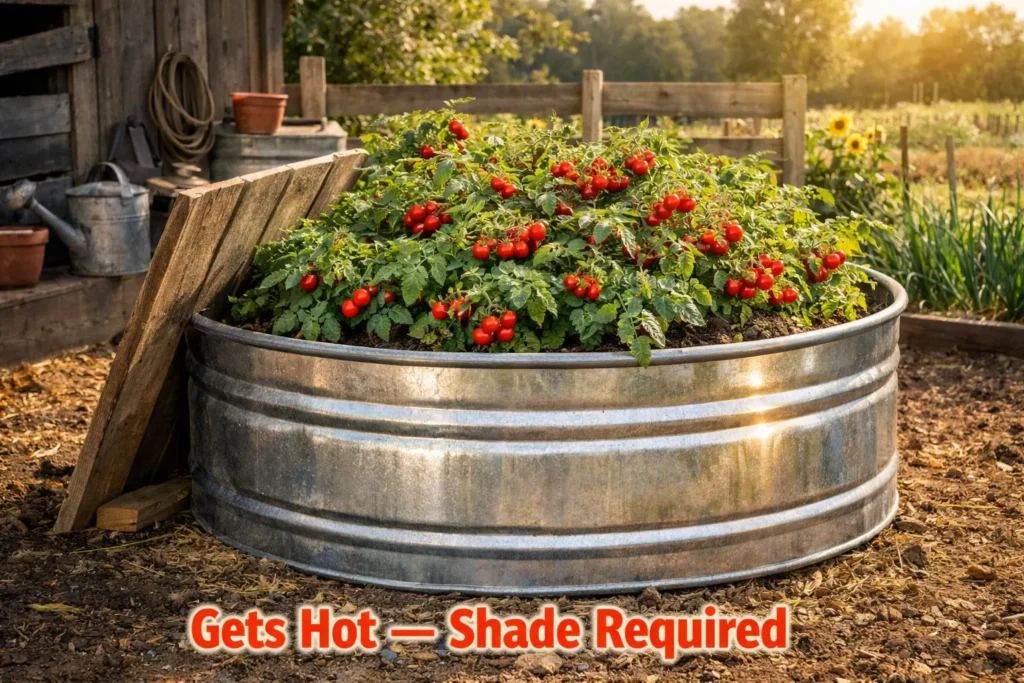
These are large round or oval metal tanks — the kind farmers use to water livestock. Set them right on the ground and fill with soil.
- Why they’re popular: They heat up in the sun, so you can plant tomatoes as early as April even in cool climates.
- Caution: In summer, you must water at midday, otherwise the roots can burn.
Pro-Tip:
The white paint on the inside of some tanks can be toxic — clean it off first and lay down landscape fabric.
Idea 8: DIY Brick or Paver Beds

This is a permanent solution. Stack bricks on top of each other like you’re building a small wall. No mortar needed.
- Where to put them: In the middle of your garden, where you want a beautiful permanent structure.
- Lifespan: Your grandchildren will still be using it.
D. Space-Saving & Unusual Designs
Idea 9: Vertical & Trellis Beds
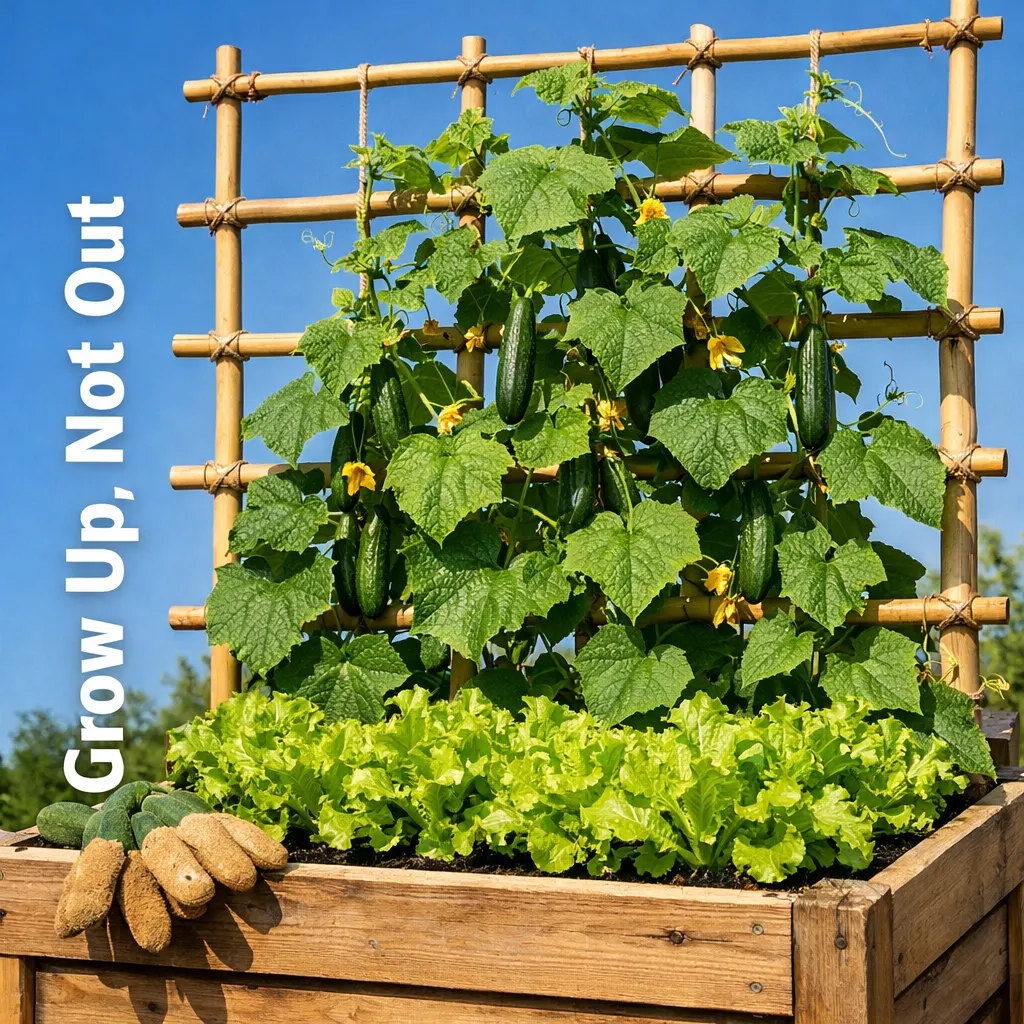
This is the same raised bed, but you attach a trellis at one end — like an old window screen or bamboo poles.
On that trellis grow climbing vegetables: cucumbers, beans, peas.
- Advantage: In the same 2x4-foot space, you can grow lettuce below and beans above.
Idea 10: Corner & L-Shaped Beds
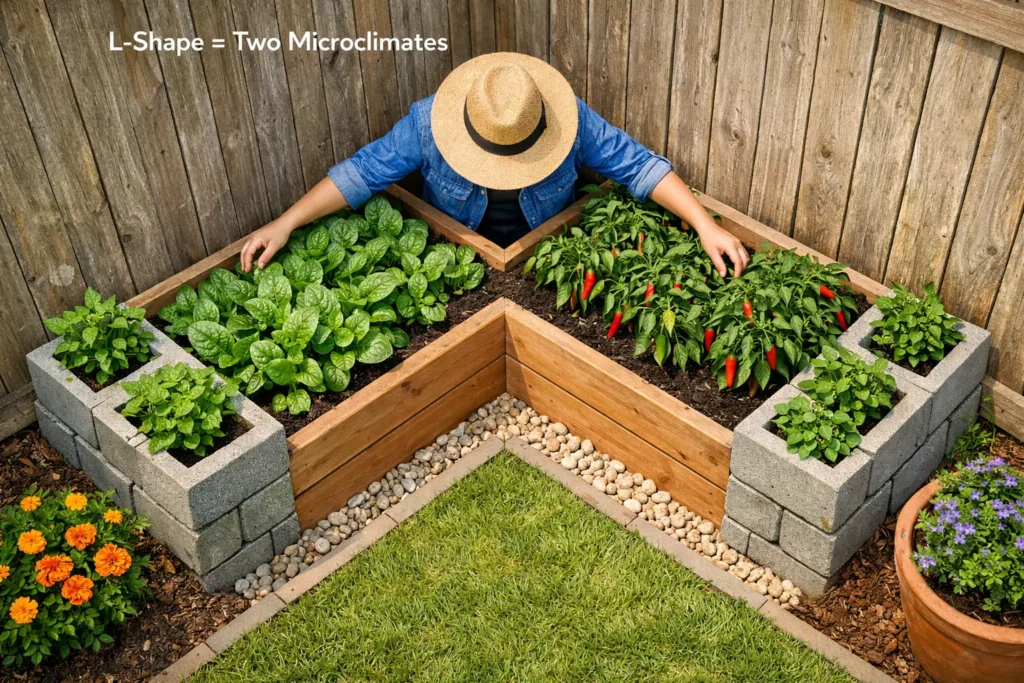
That corner of your yard that never gets used — build an L-shaped bed there.
One arm facing north, the other facing east. This not only uses the space but also creates two different microclimates.
- Why it’s great: In one corner you can grow cool-season veggies (spinach) and in the other corner warm-season (chilies).
Idea 11: Tiered & Stepped Beds
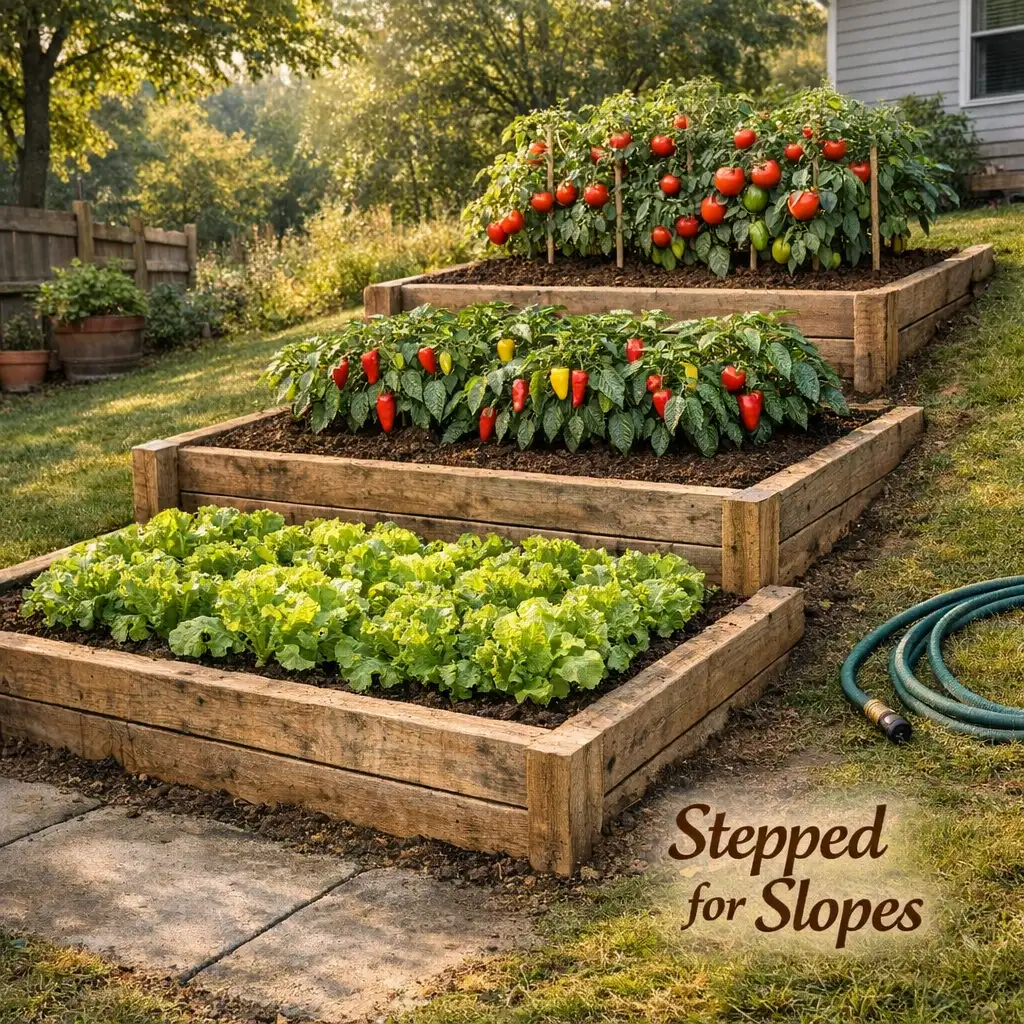
If your yard is on a slope, a regular bed will let soil wash downhill.
The solution: build three small beds like stairs. Each bed is 12 inches higher than the one in front. It looks so good that your neighbors will ask, “Who built that?”
Idea 12: U-Shaped Beds
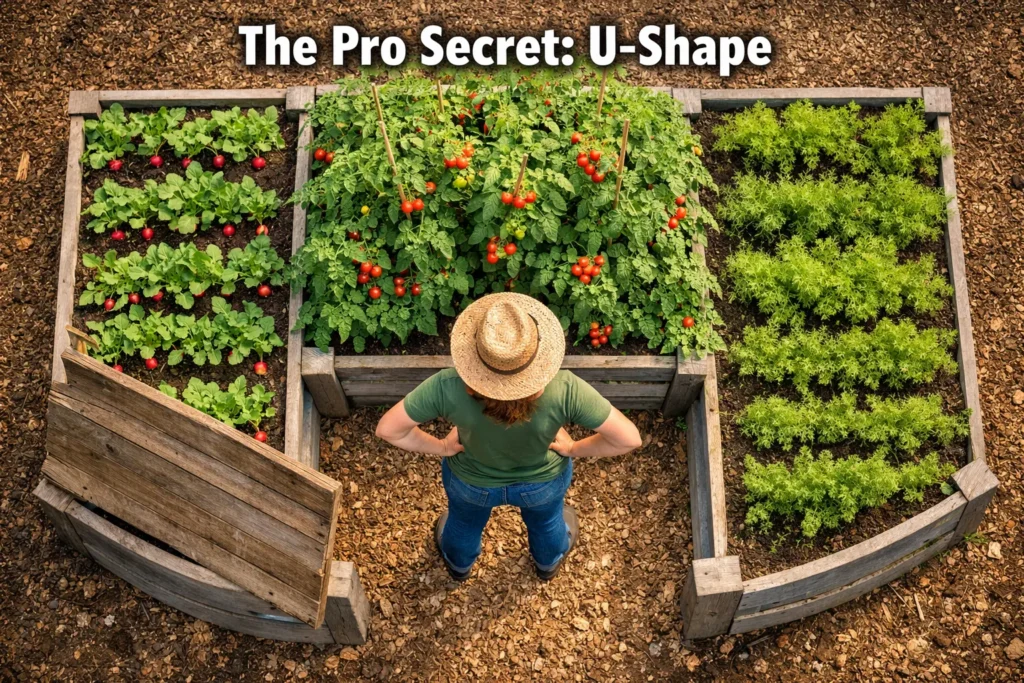
This is the design every professional gardener keeps secret.
U-shaped means: three arms — left, right, and front — with a space in the middle where you can stand and reach every plant.
- Best size: 8 feet long, 4 feet wide, with a 2-foot path in the middle.
- What to plant: Tall plants (tomatoes) in the middle section, short plants (radishes, carrots) on the arms.
3. How to Build the Perfect Bed — Step-by-Step Strategy
This isn’t theory; these are practical instructions.
First rule: Never go wider than 4 feet
Why? Because your arm reach is about 2 feet. If the bed is 5 feet wide, you won’t be able to reach the plants in the middle.
Length — as long as you want, 8 feet, 12 feet. But the width is no more than 4 feet.
Height: How high should it be?
- 10-12 inches: Only for lettuce, spinach, herbs
- 18-24 inches: For carrots, potatoes, and tomatoes (roots go deep)
- 30-36 inches: For wheelchair users or people with severe back issues (work standing up)
Choosing wood: Toxic vs. safe
Old pressure-treated wood contained arsenic — never use it.
New ACQ-treated wood is relatively safe, but it’s still better to line the inside with plastic sheeting.
Best of all: Cedar or Black Locust — naturally rot-resistant.
Bottom layer: The “Lasagna” method
Filling the entire bed with expensive soil is a waste of money. Instead:
- At the very bottom, lay cardboard boxes (to kill grass)
- On top of that, add dry branches, leaves, and grass clippings (this is the hugelkultur method)
- Then some compost
- On top, 6-8 inches of good soil
This cuts your filling cost in half, and the branches rot down into organic matter.
4. The Golden Soil Formula — Called “Mel’s Mix”
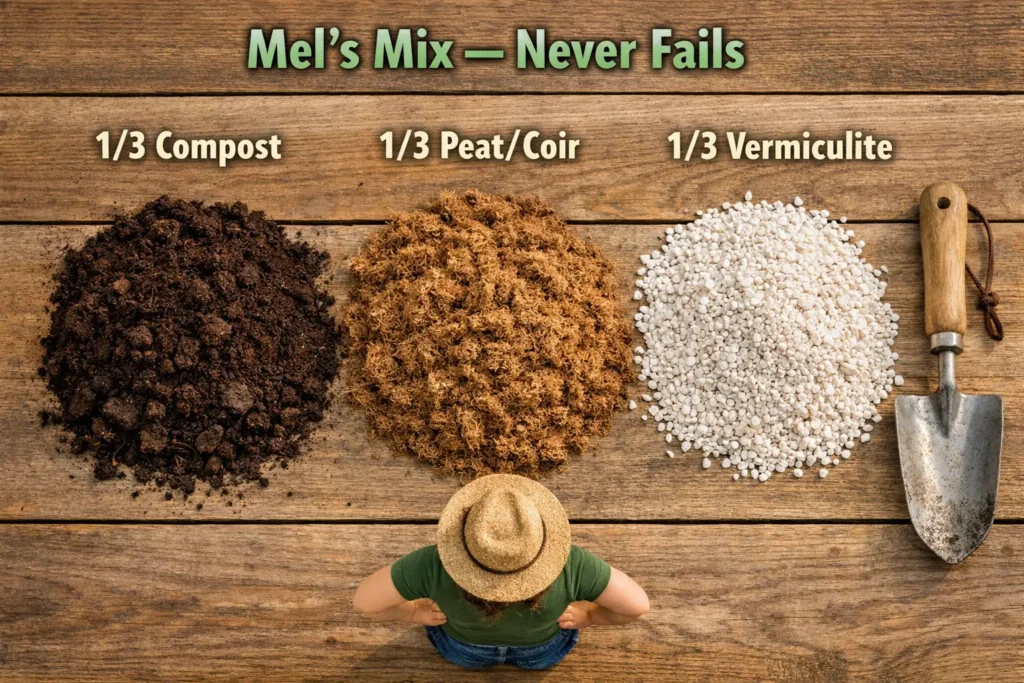
I’ve tried hundreds of mixes over 20 years. This is the formula that never fails:
1/3 compost — for nutrition (manure, leaf mold, or bagged from the garden store)
1/3 peat moss or coco coir — for moisture retention (peat moss is slightly acidic, but most vegetables like it)
1/3 vermiculite or perlite — for aeration (keeps soil from turning into a cake)
Mix these three thoroughly.
Pro-Tip:
While mixing, add a little bit of old wood ash (for potassium) and a cup of organic fertilizer (like neem meal).
How to fill on a budget:
If the bed is deep (24 inches), put this good mix only in the top 12 inches. Fill the bottom 12 inches with just old branches, leaves, and grass clippings. The roots will reach down in a few months, and by then the organic matter will have rotted.
5. What to Plant and How to Arrange It — Layout Strategy
Best vegetables that thrive in raised beds:
- Tomatoes (from cherry to beefsteak)
- Peppers (bell peppers, green chilies, black pepper)
- Lettuce (any kind)
- Carrots (grow straight because the soil is loose)
- Beans (bush beans, no trellis needed)
- Cucumber (put up a trellis and it will grow vertically)
A small companion planting table:
| Main Plant | Plant With | Benefit |
|---|---|---|
| Tomatoes | Marigold | Keeps away nematodes and whiteflies |
| Tomatoes | Basil | Better flavor and increased fruit production |
| Peppers | Onions | Aphids run away |
| Carrots | Onions | Carrot fly stays away because of onion smell |
| Cucumber | Nasturtium (a flower) | Cucumber beetles go to the flower instead |
Layout rule — arrange by height:
- North side (tallest): Climbing plants on trellis (cucumber, beans)
- Middle (medium height): Tomatoes, eggplant, peppers
- South side (shortest): Lettuce, spinach, radishes
- Edges: Trailing herbs like thyme, oregano (they hang down and don’t take up space)
Succession planting method:
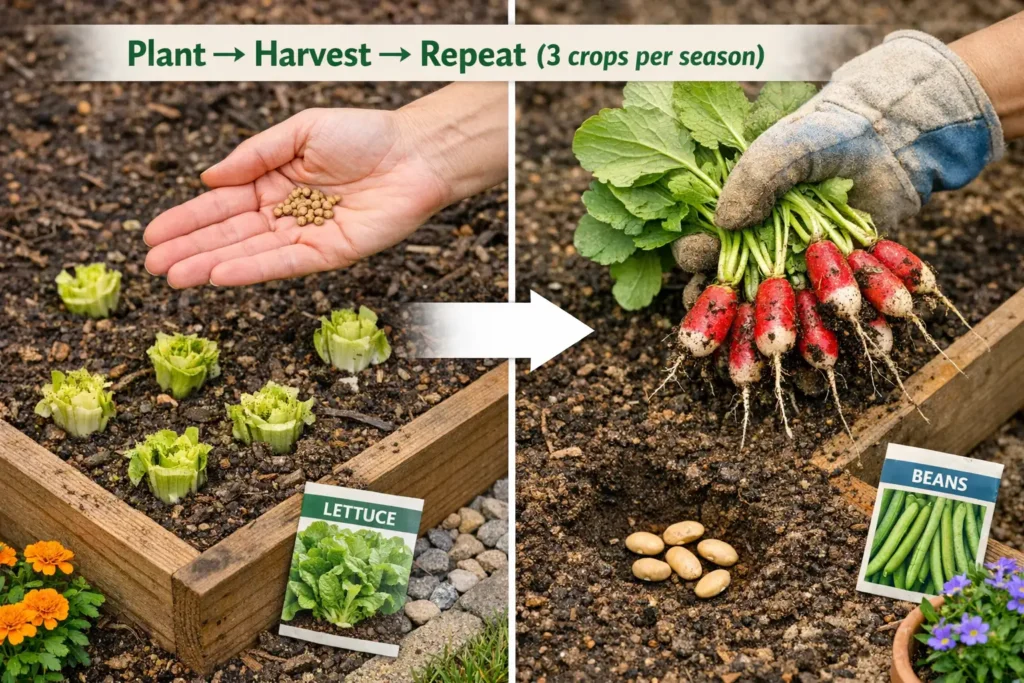
When you cut your lettuce, immediately sow new seeds in its place.
When radishes come out, plant beans in their spot.
That way, from a single bed you can get three harvests in one season.
6. Maintenance, Watering, and Extending the Season
Best way to water — drip line
Sprinklers wet the leaves and cause fungus.
A drip line (a thin hose with small holes) delivers water straight to the roots.
Install it once, add a timer — you can go on vacation and the bed will water itself.
How often to water?
In summer, daily. In winter, every other day. A rule of thumb: stick your finger 2 inches into the soil — if it feels dry, water.
How to revive the soil every spring — the “Top Dressing” method
You don’t need to dig up the soil.
Just put 1-2 inches of good compost on top and lightly rake it. Rain and water will carry it down.
This no-till method keeps soil structure healthy.
Extending the season — a small greenhouse with PVC and plastic
Push 4-foot PVC pipes into the edges of the bed, bend them over to form arches, and lay clear plastic over them.
This small structure lets you grow vegetables for 3 weeks before the first frost and 3 weeks after.
When warm weather comes, remove the plastic.
How to put the bed to sleep for winter (Winterization):
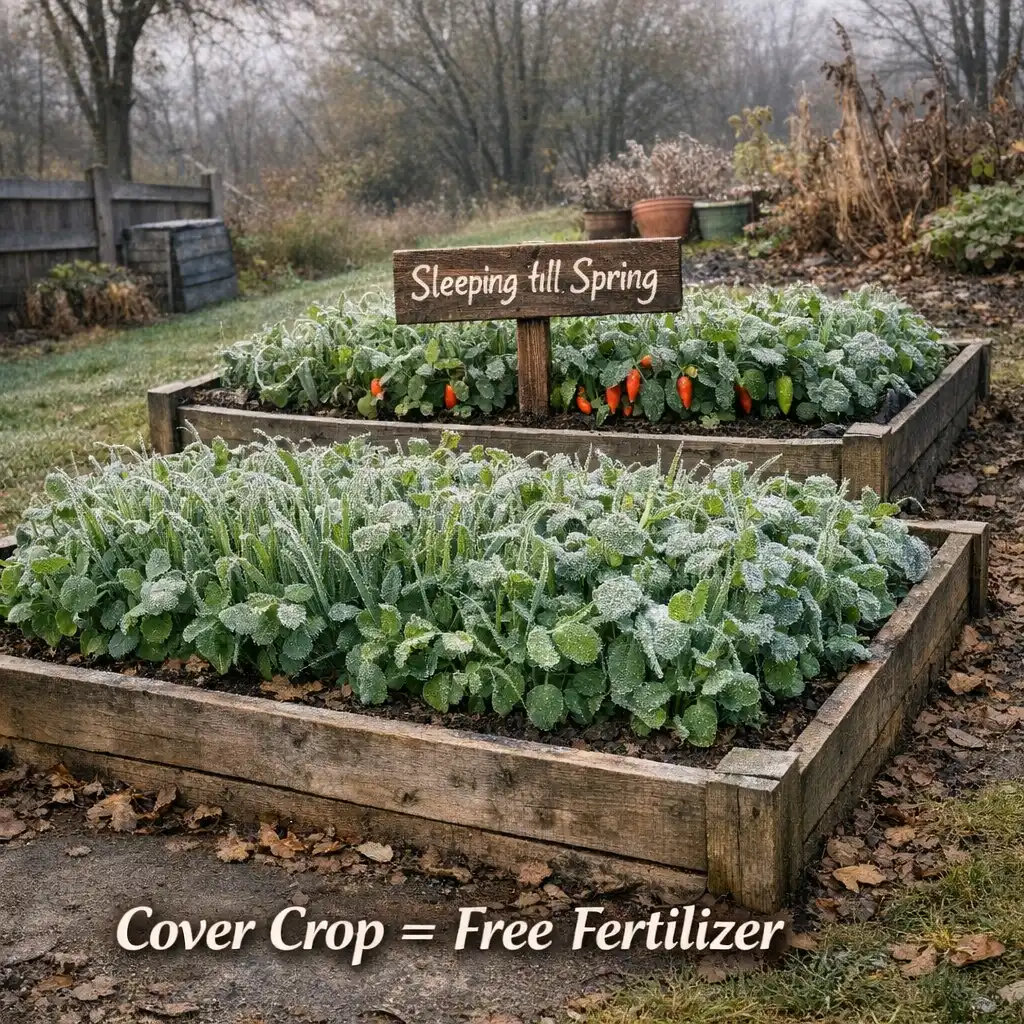
After the vegetables are done, don’t leave the bed empty.
Sow a “cover crop” like oats, field peas, or mustard.
These protect the soil from erosion, and in spring, you cut them and mix them into the soil — they become green manure.
Or just put 3-4 inches of mulch (leaves, straw) on the bed.
7. Frequently Asked Questions (FAQ)
How deep is deep enough?
Can I put a raised bed on a concrete floor?
Do I have to change the soil every year?
What should I put at the bottom?
Do galvanized (metal) beds get too hot?
Can I grow root vegetables like potatoes?
Conclusion: Stop Planning, Start Building
You might have thought that building a raised bed is expensive or hard. But you’ve seen — from pallets to old pools, anything can become a bed.
My one piece of advice: Start small.
Build just one 4x4-foot bed. Plant three tomatoes, four peppers, and some lettuce.
Learn from that one bed, then build two beds next year.
Remember: An imperfect action is better than perfect inaction.
Measure a spot in your yard today, collect some pallets or wood, and build a bed this weekend.
If you’ve ever turned something old (an old sink, a broken cabinet, an old wheelbarrow) into a bed, tell us in the comments. It might give someone else an idea.
Follow our Instagram account to get more images.
Happy gardening.